
From Clutter to Clarity: How to Build Your First Automated Workflow in Vandalizer
If you’re a Research Administrator, you know the drill. You’re handed a funding announcement: a dense, 50-page PDF where the deadline is on page 3, the budget limits are on page 27, and the required documents are scattered throughout. Every agency formats them differently, and your job is to pull out the critical details consistently, every single time. It’s repetitive, time-consuming, and vital to get right.
Well, what if you could build a reusable recipe that does the heavy lifting for you?
That’s exactly what Workflows in Vandalizer are designed to do. A workflow is a sequence of AI tasks you create once and can reuse on similar documents forever. Think of it as your own personal AI assistant, trained by you to perform multi-step processes with perfect consistency.
In this guide, you’ll learn how to build your first workflow by following a real-world example — creating a Request for Applications (RFA) checklist from start to finish.
Before You Build: Start with the Destination
Every successful workflow begins with a simple two-question plan. Before you even click a button, ask yourself:
- What is my Input? (e.g., A PDF of a Research Funding Announcement)
- What is my desired output? (e.g., A clean, standardized checklist with all key dates, budget info, and submission requirements)
Knowing your start and end points is the most important step. The rest is just connecting the dots.
Understanding the Building Blocks
A Vandalizer workflow is built by chaining steps together. The output from one step becomes the input for the next one.
- Task: A single, specific job for the AI, like “Find all the deadlines in this document”.
- Step: A group of tasks that run together on the same input.
- Workflow: The complete, ordered sequence of your steps.
Let’s Build: Your RFA Checklist
Workflow
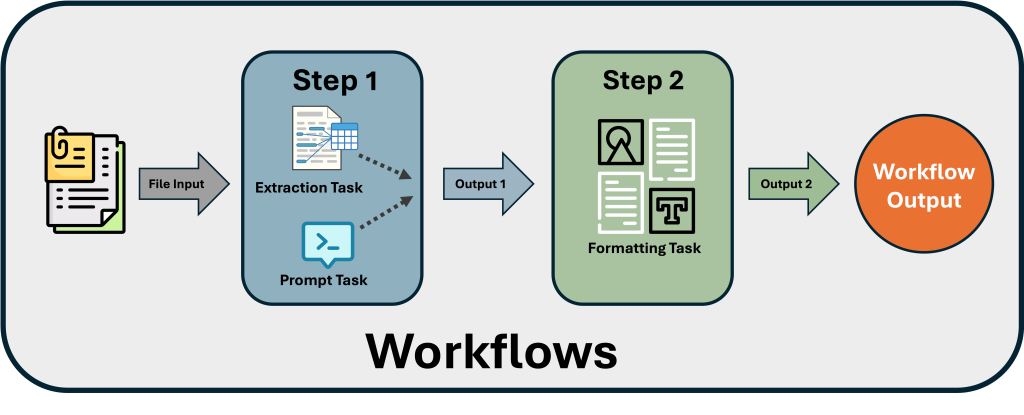
We’ll create a two-step workflow to turn any RFA into a simple checklist.
First, drag and drop your RFA file into the Document Viewer window on the left. Vandalizer will begin its Optical Character Recognition (OCR) process to extract the text. Once the loading symbol turns into a code icon, you’re ready to go.
The key to a powerful workflow is to break a big request into smaller, focused tasks. Instead of one giant prompt asking for everything, we’ll create several simple prompts that run in parallel. This makes the AI more accurate.
For our RFA checklist, we’ll create six separate Prompt Tasks:
- One for Dates & Deadlines
- One for Eligibility Requirements
- One for Award Information
- One for Application Components
- One for Budget Requirements
- One for Submission Details
We’ll also create one final Formatting Task to organize the outputs from the first six tasks into a clean list.
Now, let’s put it all together. In the Toolbox window on the right, click the Workflows tab and create a new workflow.
- Build Step 1 (Extraction): Add your first step. Inside this step, add your six extraction prompt tasks (Dates & Deadlines, Eligibility, etc.). Because they are all in the same step, Vandalizer runs them all at once on the source document, which is fast and efficient.
- Build Step 2 (Formatting): Now, click “Add Step” to create the second step in your sequence. In this new step, add your single Formatting prompt task. This task will take the combined output from all six tasks in Step 1 and arrange it into your final, tidy checklist.
Your finished workflow structure should look clean and simple, like this:
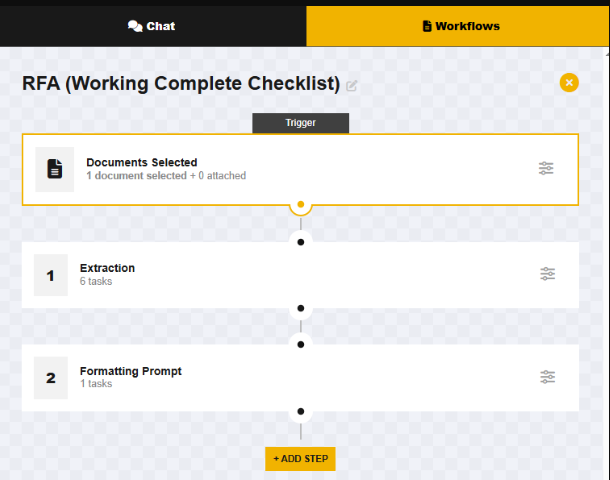
With your RFA selected, simply click the “Run” button. Vandalizer will execute the workflow, giving you a perfectly formatted checklist in moments.
The best part? This workflow is now saved to your workspace. The next time you get an RFA from any agency, just upload it, select your “RFA Checklist” workflow, and click run.
A Quick Word on Prompting
If you’re new to writing prompts, don’t worry. The key is to be clear and direct. Think of it as giving instructions to a very capable, but very literal, assistant.
- Be Specific: Instead of “find requirements,” try “Extract all eligibility requirements for the applying institution.”
- Give Context: Start your formatting prompt with context like, “You are a research administrator. Consolidate the following information into a clear checklist using markdown.”
- Provide an Example: If you want a specific output, show it! For example: “List all deadlines like this: – Deadline Name: YYYY-MM-DD”.